


This example will show you how to use the capabilities of PowerShell in workflows. Here we will discuss some of the possible interactions between workflows and the Microsoft Exchange server using PowerShell scripts; however, the capabilities of PowerShell scripts in SharePoint workflows are not limited to the examples given here.
- Workflow that creates user AD account
- Process of workflow creation
- Workflow appearance and results
- Conclusions
Workflow that creates user AD account
We will create a workflow that will automatically create a user account in Active Directory and a mailbox for this user when a new list item containing user data is added. Data from the list item are used for filling the necessary fields in the Active Directory account.
We will use both standard SharePoint actions and actions from the HarePoint Workflow Extensions for creating a workflow. The list of the components used is:
| Component name and type | Workflow components used | |
| SharePoint Workflow | HarePoint Workflow Extensions | |
| Set Encrypted Passwords (Action) |  | |
| Create User in Active Directory (Action) | | |
| Set Workflow Variable (Action) | |
|
| Log to History List | |
|
| Change Active Directory Account Settings (Action) | | |
| Set User’s Attribute in Active Directory (Action) | | |
| Pause for Duration (Action) | |
|
| Execute PowerShell Script (Action) | | |
This workflow will be started when creating a new item in the Users list. The new item is available in the workflow code as “Current Item”.
Important: usable item fields must be filled for script operation. The list of necessary fields for this example is:
- Last Name
- Company
- Address
- City
- ZIP/Postal Code
- Job Title
Procedure of the workflow operation:
- Specify the login and password of a user (or users) on which the workflow will conduct operations with Microsoft Exchange server and Active Directory.
- Create a new account in Active Directory using information from the Current Item.
- Pause for the server to apply the configurations.
- Create a mailbox for the user on the Microsoft Exchange server.
Process of workflow creation
1. Create a list to which a workflow will be linked on the SharePoint site.
Let’s create a list of the “Contacts” type and, for example, name this list “Users”.
2. Create a workflow of the “List Workflow” type.
Specify the “Users” list as a list that is capable of processing the workflow. Mark the “Start workflow automatically when an item is created” checkbox in the workflow settings. This is necessary to launch the workflow and process a new item when it is created. If desirable, you can leave this checkbox unmarked and launch the workflow for each item manually.
3. Specify data of the user-administrator.
Permissions to write in the Active Directory and on the Microsoft Exchange server are required for proper workflow operation.
There are two ways to specify authorization data.
First method. Separate specification of account data for the Active Directory administrator and Microsoft Exchange administrator. The action “Set Active Directory Authentication” is used to specify data of the Active Directory administrator. To get administration access to the Microsoft Exchange server, you can use Secure Store App ID.
In this case, the password of a user account with write permission to Active Directory is specified in the workflow code in the open form, which is unacceptable for many organizations. This problem can be avoided using the second method.
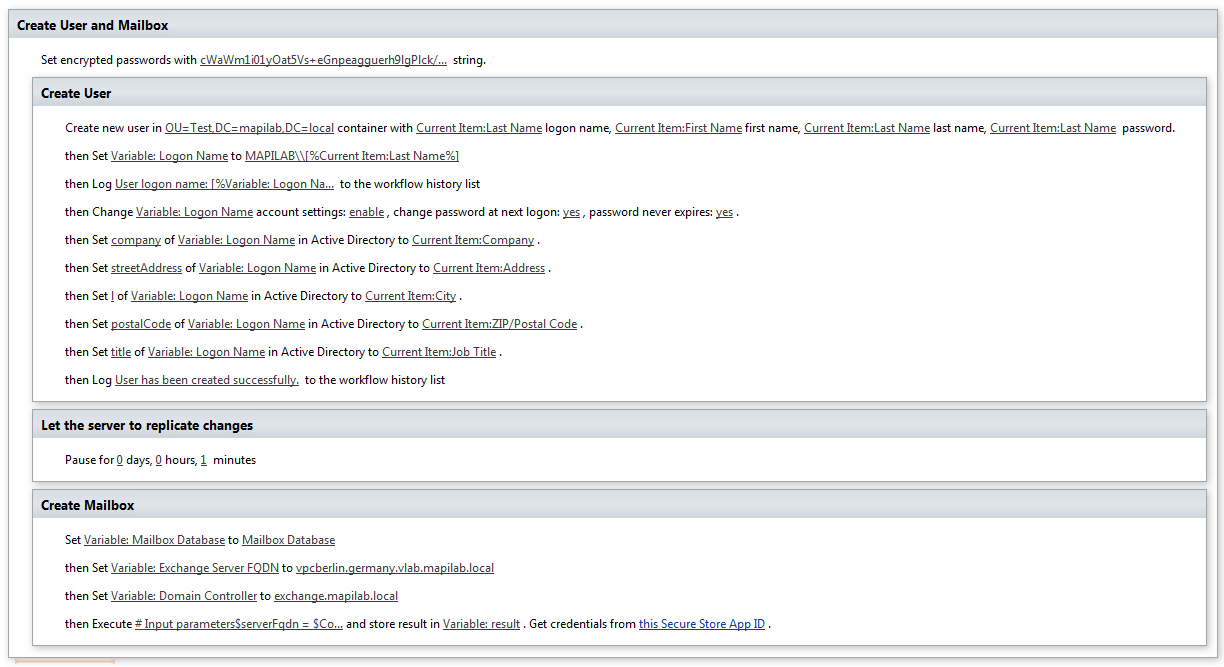
Second method. We use this method in the example. Using the “Set Encrypted Passwords” action, specify the data for all needed accounts in the encrypted form. To encrypt data, use the utility “EncryptCredentials.exe” included in the contents of the HarePoint Workflow Extensions distribution kit. Logins and passwords for Active Directory and PowerShell are necessary for the workflow in the example.
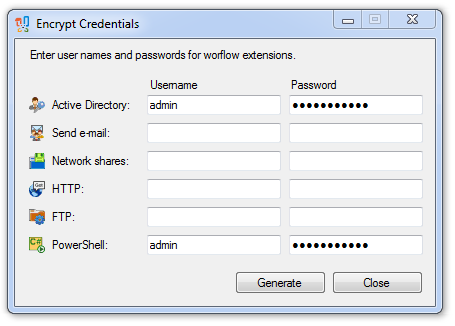
After data are entered, click “Generate” and copy the text from the new window:
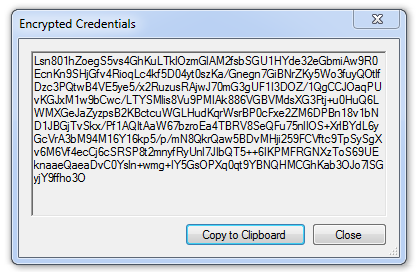
In the “Set Encrypted Passwords” action specify the copied text in the parameter “with this string”.
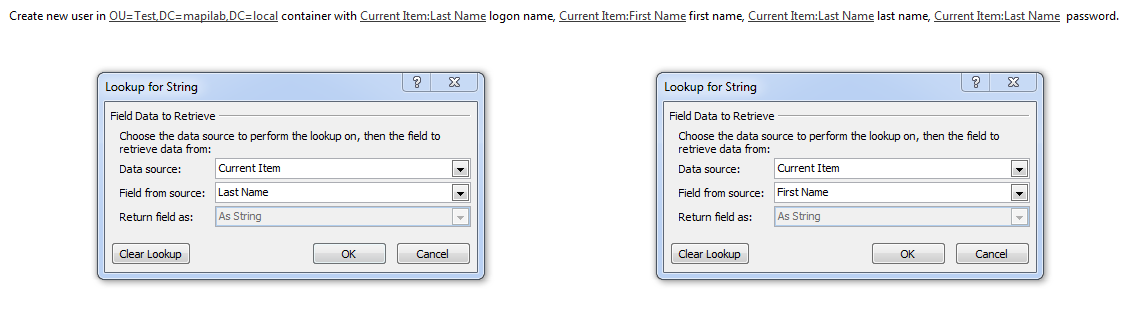
4. Using the “Create User in Active Directory” action, create a new user in the Active Directory catalogue service.
You can use an arbitrary sequence of symbols as a temporary password, for example, we use the user’s last name.
5. Configure user profile.
Since we will often need a username of type“DOMAIN_NAME\USER_NAME”, where one part, user name, dynamically changes from item to item, we save this string to the variable “Logon Name”.
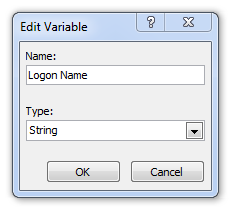

Important: two slashes are used in the variable instead of one. This is due to the fact that a slash is a special symbol and cancels the action of the next special symbol or variable, thus it must be screened.

Here we need to set the account configuration. For example, here you can specify that the system will ask the user to change the password upon the first entry. You can also specify that the expiration date will not be tracked for the user`s password.
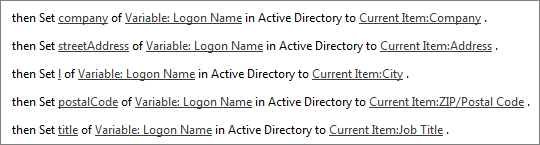
6. Fill user profile using data from the list item.
7. Stop process to ensure that the server has applied all the settings.

8. Prepare variables with data for PowerShell script operation.
Create variables:
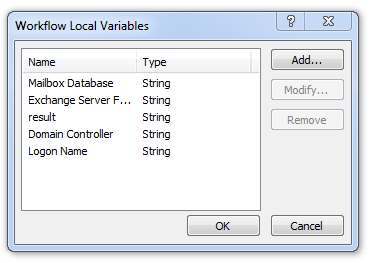
And give them appropriate values:

9. Run script which will create a mailbox for a user.
To do this, use the “Execute PowerShell Script”. You need to pass the script code to the first parameter and the previously created variable “result” to the second parameter. The third parameter need not be used, if you used the “Set Encrypted Passwords” action for administration access. You can alternatively use the third parameter in “Execute PowerShell Script” to get the necessary permissions. You can read details on the creation of “Secure Store App ID” on the Microsoft site.

The PowerShell script code, which will create a mailbox for the previously created Active Directory user account when working with Microsoft Exchange 2007, is:
# Input parameters

$serverFqdn = $Context.GetWorkflowVariable("Exchange Server FQDN")
$id = $Context.GetWorkflowVariable("Logon Name")
$mdb = $Context.GetWorkflowVariable("Mailbox Database")
$dc = $Context.GetWorkflowVariable("Domain Controller")

Write-Host $serverFqdn

# Connect to Exchange 2007

$session = New-PSSession -ComputerName $serverFqdn -Authentication Kerberos -Credential $pscredential -ErrorAction Stop
Invoke-Command -Session $session { Add-PSSnapin Microsoft.Exchange.Management.PowerShell.Admin }
Invoke-Command -Session $session { Enable-Mailbox -DomainController $args[2] $args[0] -Database $args[1] -ErrorAction Stop } -ArgumentList $id,$mdb,$dc  -ErrorAction Stop

# Close session

if(-not $session -eq $null)
{
    Remove-PSSession $session
}

Write-Host "Completed."
The PowerShell script code, which will create a mailbox for the previously created Active Directory user account when working with Microsoft Exchange 2010, is:
# Input parameters

$serverFqdn = $Context.GetWorkflowVariable("Exchange Server FQDN")
$id = $Context.GetWorkflowVariable("Logon Name")
$mdb = $Context.GetWorkflowVariable("Mailbox Database")
$dc = $Context.GetWorkflowVariable("Domain Controller")

# Attempt to connect to Exchange 2010

$url = "http://" + $serverFqdn+ "/PowerShell"
$session = New-PSSession -ConnectionUri $url -ConfigurationName Microsoft.Exchange -Authentication Kerberos -Credential $pscredential -ErrorAction Stop
Import-PSSession $session
Enable-Mailbox -Identity $id -Database $mdb -DomainController $dc -ErrorAction Stop

# Close session

if(-not $session -eq $null)
{
    Remove-PSSession $session
}

Write-Host "Completed."
Workflow appearance and results
Save and publish the workflow.
When a new item in the “Users” list is created, the workflow will automatically create an Active Directory account and mailbox for the new user.

After the workflow is done, the new user can start working in the system. On the first entry, he will be asked to change the password, as we specified in the account configuration.
Conclusions
SharePoint workflows allow you to automate multiple typical tasks which, despite their clear logic, are time-consuming for employees. However, the standard set of actions and conditions is limited.
HarePoint Workflow Extensions significantly extends the capabilities of workflows. More than 300 actions have been developed for real tasks, including actions executing user code.
Besides the given example for PowerShell, you can also use C# or VB.NET scripts in workflows, which makes the capabilities of workflows practically unlimited.