


This article describes how to create a SharePoint Workflow which will automatically resize an image when a user saves it in a document library. We will create a workflow which not only resizes the image but also converts it if the source image is in an uncompressed format. Also, our Workflow will get the EXIF data from the source file and add it to the document library field.
To show you how the Workflow works, we have created a diagram in Microsoft Visio. We will not use Microsoft Visio to create this workflow because it is not a complex workflow and can be created in SharePoint Designer directly. This is what the Workflow looks like in Microsoft Visio:
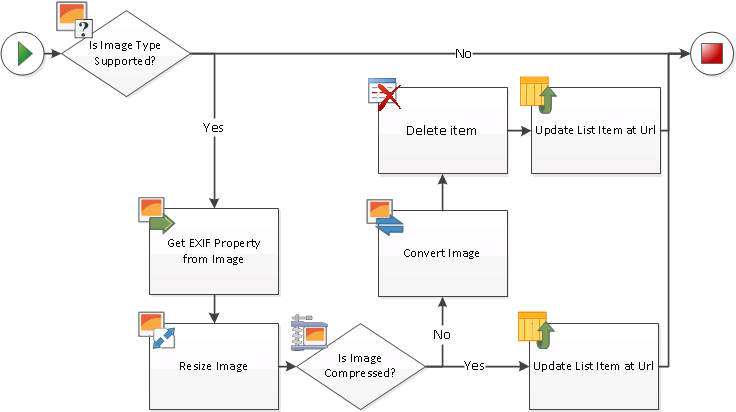
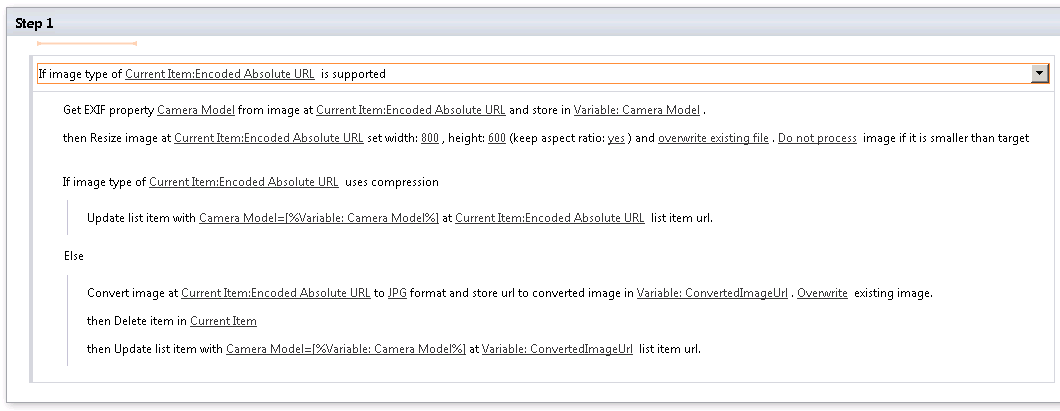
The Workflow works in following manner: first it detects the format of an uploaded file and if it is an image — the process will be run on the file.
For any processed file, the workflow will gather the EXIF data (we will get details on which a digital camera was used to shoot the image), detect whether the image is in a compressed format (JPG, GIF) or not (TIFF, BMP), and convert/resize the image if necessary.
This type of workflow cannot be created using SharePoint Workflow’s own conditions and actions, so we will use several components from HarePoint Workflow Extensions. The list of components used is:
| Component name and type | Set of Workflow components | |
| SharePoint Workflow | HarePoint Workflow Extensions | |
| Is the Image type supported (Condition) |  | |
| Get EXIF property from Image (Action) | | |
| Resize Image (Action) | | |
| Is the Image compressed (Condition) | | |
| Update List Item (Action) | | |
| Convert Image (Action) | | |
| Delete Item (Action) | |
|
Let’s start making Workflow.
1. Create a new document library or modify an existing one. It is necessary to add one additional field where the Workflow will save the information about the model of the camera used to take the photo. Name this filed “Camera Model”.
2. Start SharePoint Designer, open the website, point to “Workflows”, click the “List Workflow” button on the ribbon and select the Document Library to which the Workflow will be linked (the Document Library which we created or modified in Step 1). Type the name of the Workflow. Click OK. The empty workflow has been created, it should look like this: 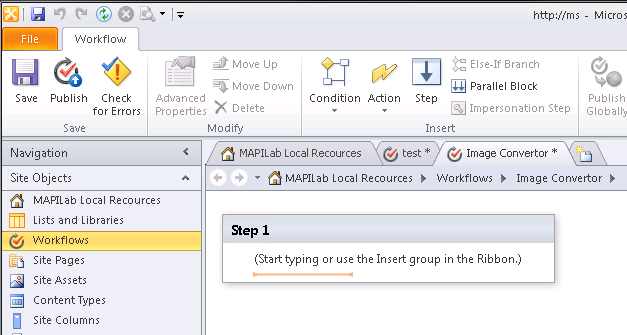
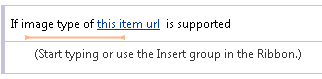
3. We should add a condition which defines the format of the document added and either leaves the document in the current format or processes it. To do this click the “Condition” button on the ribbon and select the “Is Image type supported (HarePoint)” condition. This condition requires entering of the Full URL of the picture in the Document Library. To set it click the “this item url” link:
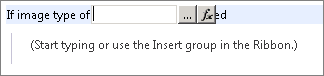
and click the “Fx” button:
Set “Current item” in the Data source field and “Encoded Absolute URL” in the “Field from source” field:
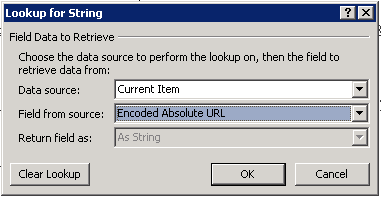
Click OK. The condition which defines the format of the document added into the Document Library is configured. It should look like this:

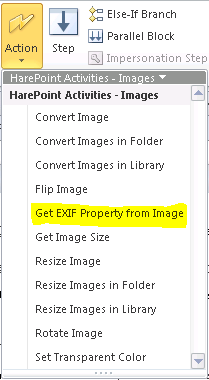
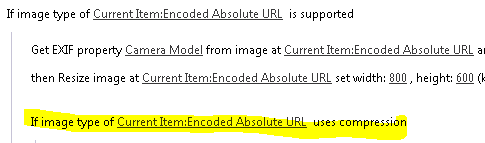
4. If the document is an image, we obtain information about shooting conditions. To do this, we should add the Action “Get EXIF property from the image”. This action is located in the Images section in the list of Actions:
For this action, we should select the field containing camera information, specify the URL of the picture in the document library from which the data should be obtained and we should also specify a variable to which the data will be assigned (we will name the variable “Camera Model”). After setting all these parameters the action should look like this:

At the end of the Workflow we will add data from the Camera Model variable to the Document Library field.
5. Our next step is to check the image size. We don’t want to upload large files to the Document Library, so we add a “Resize Image” action, which allows us to reduce an image`s size.
For this action we should specify the URL of the image in the Document Library, set the values of the width and the height to which the image must be resized (it is possible to keep the aspect ratio). Also we should specify what must be done with the resized image: overwrite the source image or add a new image with “_resize” at the end of file name. The last parameter defines what the action must to do if the image is smaller than the target file. We will resize the image to 800 x 600 pixels and keep the aspect ratio, overwrite the existing file and we will not process the file if it is smaller than the target file:

6. If you will try to upload a large file, for example, a TIFF image, the Workflow must convert it to an optimized JPG image. Now we will check whether this image is compressed. To do this we should add the “Is Image Compressed (HarePoint)” condition. This condition requires specifying the only parameter: the url to the image in the Document Library. The configured component looks like:
7. If the file is already compressed, we will just have to add the camera model information to a new Document Library element. We can do this using the “Update List Item at URL” action. For this action we should specify which field we should update and set the data which will be entered into this field. Click the “specified values” link in the action parameter and set the value like this:
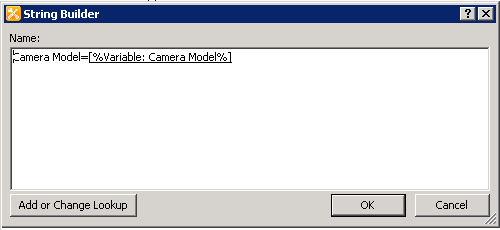
To add the value [%Variable: Camera Model%] click the “Add or Change Lookup” button and set the following values:
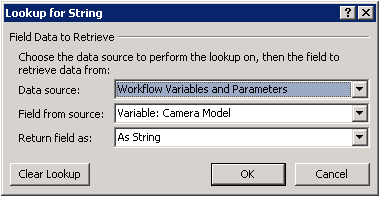
We specified that we want to update the Camera Model column and set its value to that of the variables we had obtained from EXIF in Step 4. In the settings we place a link to the image that needs to be added. The configured action looks like this:

8. Type “Else” to specify which actions should be executed if the image has not been compressed.
9. If the image has not been compressed, its format has to be changed. To do this, we use the “Convert Image” action. In the settings we should specify the url of the image in the Document Library that has to be converted. We should also set the new required format. Two other parameters which should be set up are: the variable which will keep the url to the converted image and what the action must to do if the file exists: overwrite or not. The configured action looks like this:

After that, we will have two files, and the source file has to be deleted in order not to leave excessive files in SharePoint.
10. To delete the source file we should add the “Delete Item” action and specify what should be deleted:

Now we have only one JPG image with the size 800×600 pixels.
11. For the new file we have to update the “Camera Model” field using the EXIF data obtained earlier. We already did it in Step 7 but the values of the parameters should be changed to:

12. The Workflow is ready, it looks like:
13. Save the Workflow.
14. At last we should set the Workflow to launch automatically when new files have been uploaded to the Document Library. To do this click the “Workflows” link in the left menu of SharePoint Designer, select your Workflow and double click it. Tick the option “Start workflow automatically when an item is created” and click the “Save” button on the ribbon.
15. Publish the Workflow. To do this, click the “Publish” button on the SharePoint Designer ribbon.
16. Test the Workflow. Try to upload a TIFF image into the document library and make sure that the image is resized and converted to the JPG format. Also check that the “Camera Model” column in the Document Library contains the data about the digital camera used to shot the image.
You can see whole process of creating such a workflow in this video:
Learn more about HarePoint Workflow Extensions and over 300 new actions to automate any business process without programming.
could this be applied to attachments on a list?
Hello Diego. Yes, it’s possible. Take a look at Copy List Item Attachments to Document Library action, for example.
Feel free to reach our support team for any assistance required.