


- Perform operations with e-mails in SharePoint workflows
- Get ready to start workflows creation
- Workflow #1 – Sending notification
- Workflow #2 – Parsing responses to notifications
- Conclusions
Updated at April 6, 2020
Using the capabilities of sending e-mail and processing incoming e-mail in workflows
This example will show you how to use actions from HarePoint Workflow Extensions for SharePoint set for working with Email. We will look at sending of messages and processing of incoming messages.
Let`s consider this situation as an example: a task list has been created on a SharePoint site. When creating a task, the employee responsible for it is chosen. However, the employee may be outside the office with no access to the corporate network. Therefore, the task is:
- To inform the employee about the task assigned via e-mail.
- To give the employee the opportunity to accept or to reject the task using an operation simple for him, for example, by simply replying to the message.
To do this, we will create two workflows. The first one, when a new list item is created, will send a message with a notification and item contents to the employee responsible for the task from a certain mailbox. The employee can then simply respond to the message (the response will come to the mailbox from which the first workflow sent the notification). The second workflow will parse the user`s answer and mark the task as approved or rejected.
To create these workflows, we will use both standard SharePoint actions and actions from the HarePoint Workflow Extensions set. The list of the used items:
| Component name and type | Set of Workflow components | |
| SharePoint Workflow | HarePoint Workflow Extensions | |
| Get List Item Url |  | |
| Send E-Mail without Attachments | | |
| Capture Text | | |
| Extract Substring | | |
| Find List Item at Url | | |
| Get Array Items Count | | |
| If any value equals value | |
|
| Stop Workflow | |
|
| Get Array Item | | |
| Get Field Value at Url | | |
| Log to History List | |
|
| Convert HTML To Text | | |
| Trim Text | | |
| Extract Substring from Start of String | |
|
| Approve Item at Url | | |
| Reject Item at Url | | |
Before starting the creation of workflows
- Create a task list
Create a list of the “Tasks” type on the SharePoint site. For example, let’s name this list “HarePoint Tasks”. - Turn on the requirement for approving items in the task list
The instructions for turning on approval for items are on the Microsoft site. - Create a list for receiving answers to notifications and configure the E-Mail support
You can watch the catalogue of lists for which the receipt of incoming e-mail is available and the instruction for configuring the incoming e-mail on the Microsoft site. Let’s take a list of the “Announcements” type as an example and name it “MailApproval”. Specify the incoming address for this list in the list settings — [email protected]
The first workflow. Sending a notification
This workflow will be automatically launched when a new item in the task list is created.
The purpose of this workflow is to send a notification.
Procedure
- Obtain the Url of the task page on the SharePoint portal
- Send a notification with the task reference and identifier via E-Mail
It is very important to specify the sender’s address.
Let’s start the creation
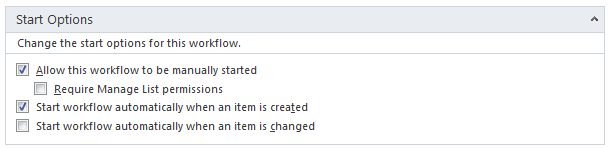
1. Create List Workflow.
Specify the name of the task list at the creation (“HarePoint Tasks”). In the workflow start options, mark the checkbox “Start workflow automatically when an item is created”:
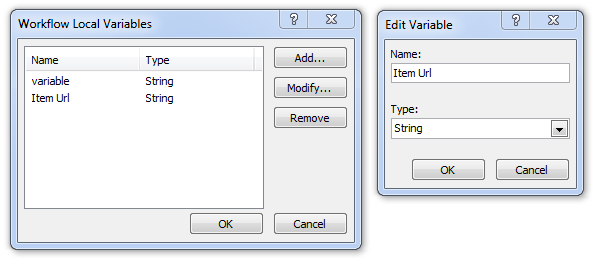
2. Create a variable, “Item Url”
3. Using the action, “Get List Item Url”, save the task page address to the created variable on the SharePoint portal.

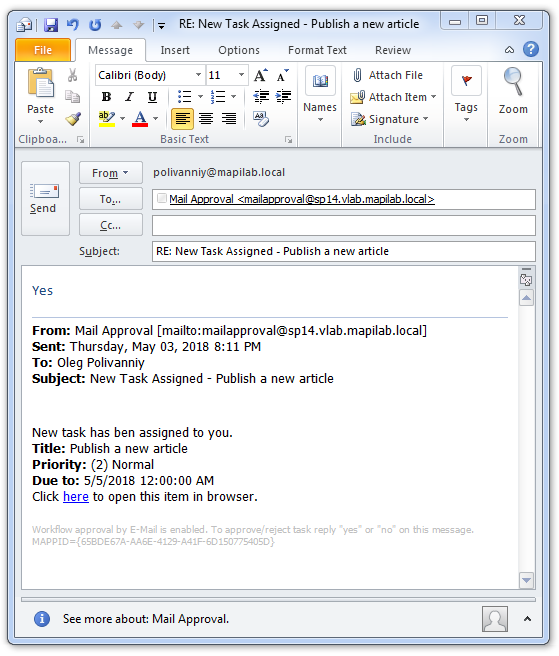
4. Using the “Send E-Mail without Attachments” action, send the message to the responsible employee.
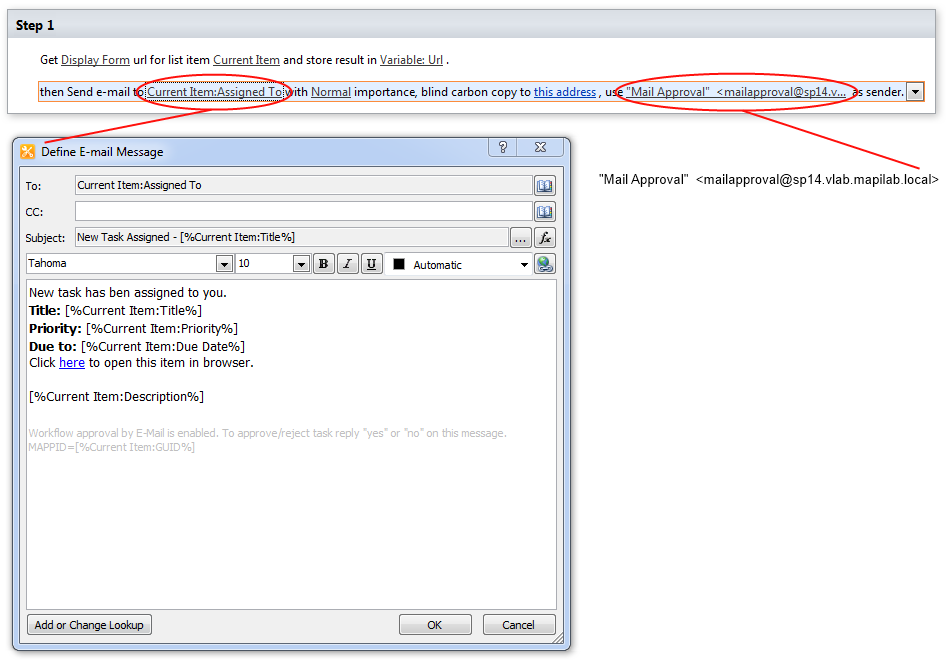
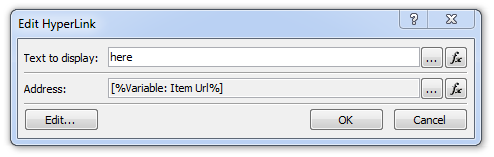
The content of variable “Item Url” is used as the address of the hyperlink to the task page:
Pay attention:
- The message text itself can be made in any suitable manner according to your goals, the style of your correspondence, or personal preferences. From the technical point of view, the most important is the last string of the message, which the second workflow (which parses responses to notifications) will use to find the item in the task list and mark it as approved or rejected.
- It is very important to specify the E-Mail address from which a notification will be send. This is the address to which responses from employees will come.
The first workflow is ready. Here is what the ready workflow looks like:

Save and publish the workflow.
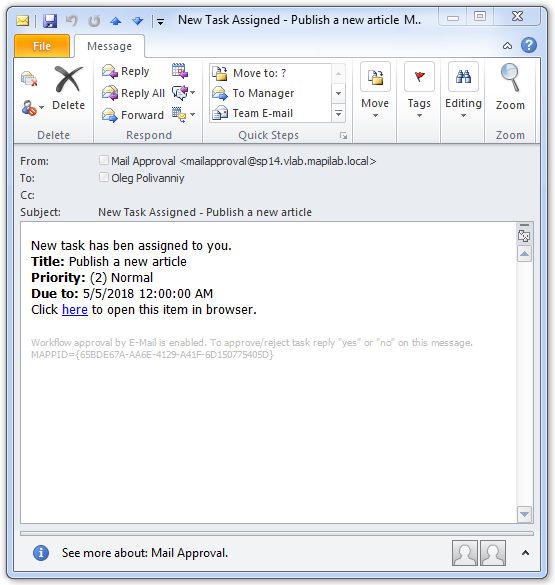
When adding a new task to the list, a message will be automatically sent to the responsible employee:
The second workflow. Parsing responses to notifications
This workflow will be automatically launched when a new item in the list of responses to notifications is created, i.e. when a new message is received.
The purpose of this workflow is to receive an answer to a notification and change the status of the task list item.
Procedure of the workflow operations
The procedure can be split into three main stages:
- Receive the reference to a task list item
- Check whether the message sender is responsible for this task
- Check whether the message (first 30 symbols) contains key words, change the status of the task list item
1. Create List Workflow
Specify the name of the task list at the creation (“MailApproval”). Mark the checkbox “Start workflow automatically when an item is created” in the workflow start options:
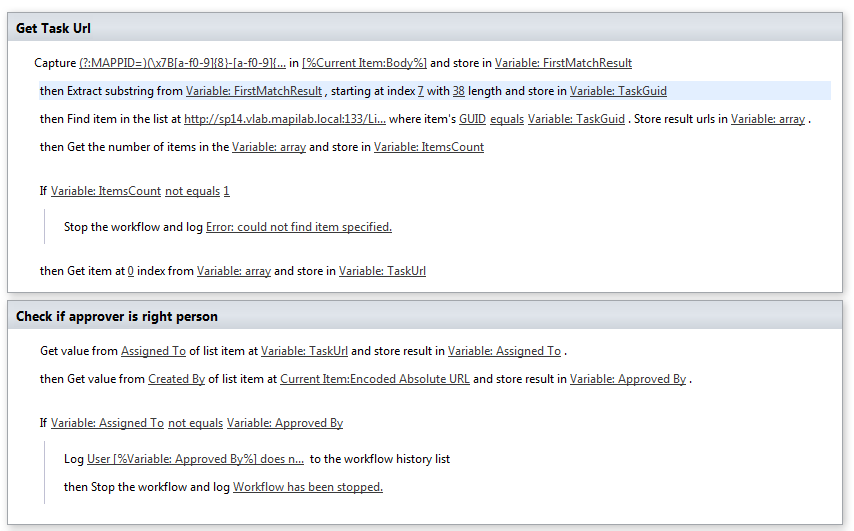
2. Obtain reference to the task list item
Use the action “Capture Text” MAPPID from the message body:

You can use regular expressions in the first parameter of this action. To obtain MAPPID the following regular expression was used:
- (?:MAPPID=)(\x7B[a-f0-9]{8}-[a-f0-9]{4}-[a-f0-9]{4}-[a-f0-9]{4}-[a-f0-9]{12}\x7D)
Using the action, “Extract Substring” extract the item identifier (GUID) from the obtained string:

Using the action “Find List Item” find all list items with the identifier just obtained:

To obtain the Url of the list in which the search is conducted, you can use the action, “Get List Url”, or simply copy this Url from the browser address string. In the case considered in the example, the browser string for the list’s address is: http://sp14.vlab.mapilab.local:133/Lists/HarePoint%20Tasks/AllItems.aspx
The whole string including the last slash is needed: http://sp14.vlab.mapilab.local:133/Lists/HarePoint%20Tasks/
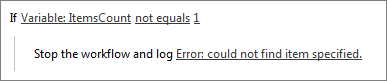
Using the action, “Get Array Items Count”, obtain the number of items found. Since we are searching by the identifier, there should be only one search result. Check this using the condition, If any value equals value:

If this condition is met, then an error occurred. The workflow failed to find the item, for example, because it has been removed, or because the message sender has changed the identifier. In this case, it is necessary to stop the workflow and make a record in the log as to why it was stopped:
If the condition was not met, everything continues. Save the reference to the item found in the variable:

The first stage is completed.
3. Check whether the message sender is responsible for this task
Only employee responsible for the task should be able to change the task status.
Using the action “Get Field Value at Url” obtain the person to whom the task is assigned:

Using the same action obtain the message author from the item of the answer list:

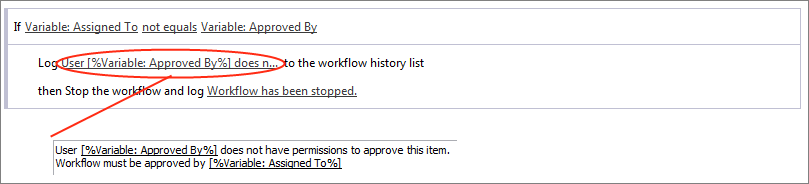
Compare whether it is the same person using the condition “If any value equals value”:

And if the condition is met (these are different people), stop the workflow retaining information for debugging and investigations in the log:
If the condition was not met, everything continues to the third stage.
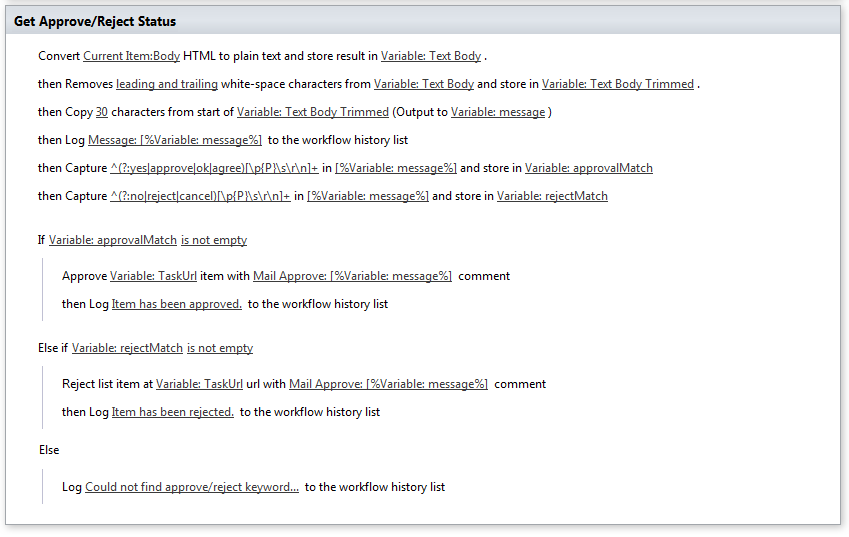
4. Check whether the message (the first 30 symbols) contains key words, change the status of the task list item.
Using the action, “Convert HTML To Text”, we retain only text in the message body:

Using the action, “Trim Text”, remove redundant spaces from the text beginning and ending:

Using the action, “Extract Substring from Start of String”, obtain the first 30 symbols from the message:

All these actions are required to separate the text of the task itself from the text checked for key words.
Using action “Capture Text” find key words in the message.

Regular expressions:
- For approving key words: ^(?:yes|approve|ok|agree)[\p{P}\s\r\n]+
- For rejecting key words: ^(?:no|reject|cancel)[\p{P}\s\r\n]+
Attention: to make a regular expression work, the response to the notification must start with a key word, because it is included in the data condition of regular expressions (“^” – the symbol of string beginning).
If the message has approving key words:
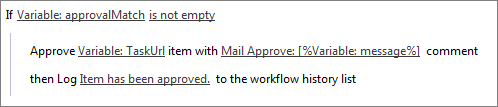
Approve the task using the action, “Approve Item at Url”, and add a record to the log.
If there are no approving key words, but there are rejecting ones:

Use the action, “Reject Item at Url,” and add a record to the log.
If the message does not have either approving or rejecting key words, we simply write the record about it to the log:

The second workflow is ready. The ready workflow looks like this:
Save and publish the workflow.
Now the answer to the notification will be processed by this workflow:
Conclusions
Email plays a significant role in SharePoint operation. Using additional actions and conditions from HarePoint Workflow Extensions optimizes the email handling capabilities of SharePoint. You can automate many actions by parsing incoming messages that otherwise would have to be done manually. Furthermore, you can build a system of notifications concerning any events with documents or list items.