


Introduction
HarePoint HelpDesk is a ready-made customer support system for internet and intranet sites based on the SharePoint platform. This solution allows you to create an efficient system for processing incoming support requests.
Deployment
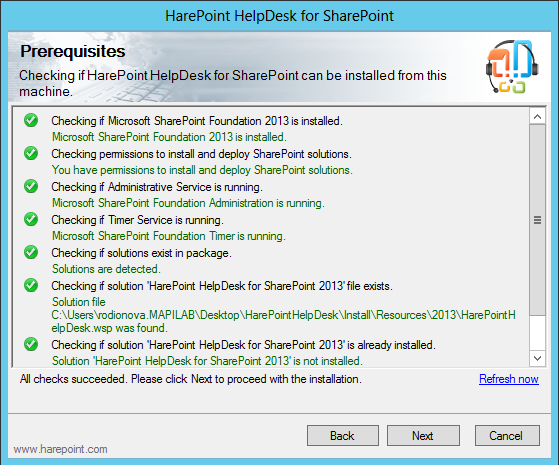
The most outstanding feature of the product is that it is easily deployed and immediately ready for use. The installed product presents a HelpDesk website template through which you can create an unlimited number of HelpDesk websites in your environment.
The product deployment takes a few minutes and is performed using a special installation wizard. As soon as you complete the wizard steps you will get an additional website template named “HarePoint HelpDesk,” based upon which you can create a fully functional HelpDesk website. As soon as a new website is created it should be configured. Look through the HelpDesk Administration Guide Section VII, “Initial Configuration,” (page 27) for details.
The HarePoint HelpDesk settings page is located in “Site Actions – Site Settings.”
HelpDesk for Users and Technicians
There are two roles in HarePoint HelpDesk:
- Technicians – SharePoint users added to HelpDesk as technicians have full access to the HelpDesk Technicians Dashboard. They can see all created requests and operate with it.
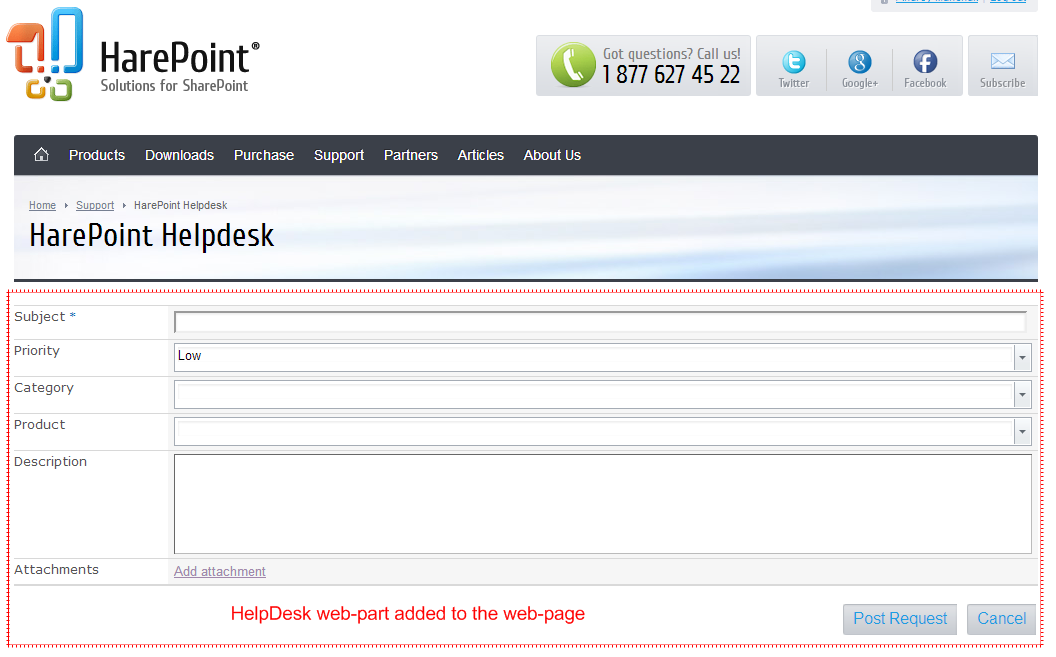
- Users – SharePoint users added as “Users” do not have access to the HelpDesk Technician Dashboard; these users interact with a special web part which should be added to a SharePoint page. Users can create new requests and can only view their own requests and replies to them.
The HarePoint HelpDesk Technician Dashboard is part of the HelpDesk website. Only users added to the “Technician Role” can explore this page. These users have full control of the HelpDesk website and content.
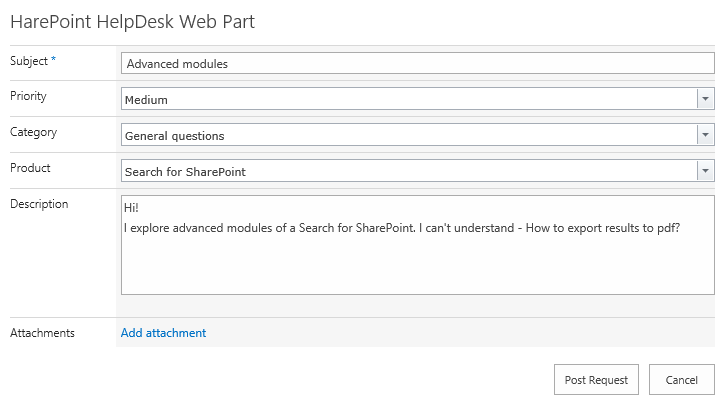
The HarePoint HelpDesk web part can be added to any web-part page of your SharePoint website and visitors to this webpage can perform standard ticket operations with the web part.
Creation of new requests
New requests can be created by one of three ways:
- By email – HelpDesk can be configured to receive incoming messages and create new requests based on them. The product can also create user accounts automatically if the user is not found.
- With the HelpDesk web part on a SharePoint page.
- By a technician – If a user calls by phone or sends a request by fax, a technician can create a new request for the user by selecting the user’s account when creating the request.
The request can include HTML formatted text and one or more attachments. You can choose permissible file types and limit the maximum file size for attachments to the request.
Notifications and alerts
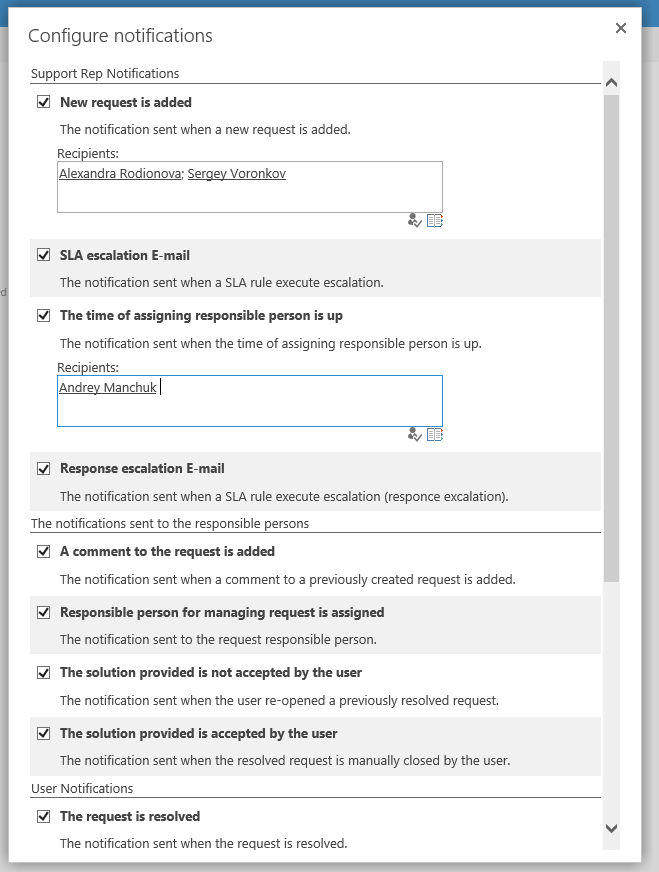
As soon as a new request is created, the product sends two notifications by email. The first message is sent to the user to confirm creation of the request. It includes the request ID# and URLs to access the list of the given user’s own requests on the SharePoint page where the HelpDesk web part is located. The second notification is sent to technicians and includes full details about new requests, excluding the attachments. It also includes the URLs to access the request in the Technician Dashboard or to view all unanswered requests there.
Messages sent to users and technicians can be customized. You can choose the data which will be included in the message, add a company logo, and change the message format as you wish.
The HarePoint HelpDesk Settings page allows you to select which notifications will be sent to users and technicians. By default, all notifications are sent when:
- a new user is created;
- a new request is created;
- a request is answered by a technician;
- a request is answered by the user;
- a request is closed;
- a request is automatically closed;
- a request is resolved;
- the resolution provided is approved by the user;
- the resolution provided is not approved by the user;
- a request assignment times out;
- a request is assigned to you;
- an SLA escalation occurs.
Assignment of requests
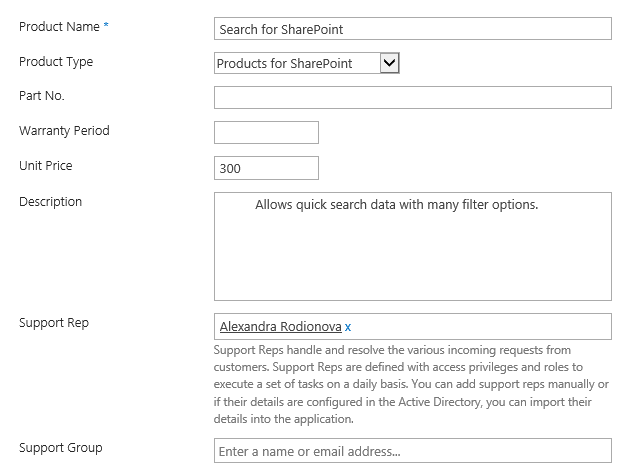
The HarePoint HelpDesk permits assignment of new requests to technicians automatically. There are two criteria upon which requests may be automatically assigned: “Product” and “Category.” During the creation of new “Category” or “Product” items it is possible to select the technician or group of technicians to which the request will be assigned when this Category (or Product) is specified by the user at the creation of a new request. As soon as the new request is created it will be assigned to the corresponding technician and an e-mail notification will be sent to this technician (or group of technicians). The technician can answer the request or assign it to other technicians (or escalate the request).
If the request cannot be assigned automatically, a technician should assign it as soon as possible, because HelpDesk continues monitoring the request and if it is not assigned to any of the technicians within two hours, a warning message will be sent to all technicians. The technician can assign one or multiple requests to a technician or group of technicians from the Technician Dashboard.
Replying to requests
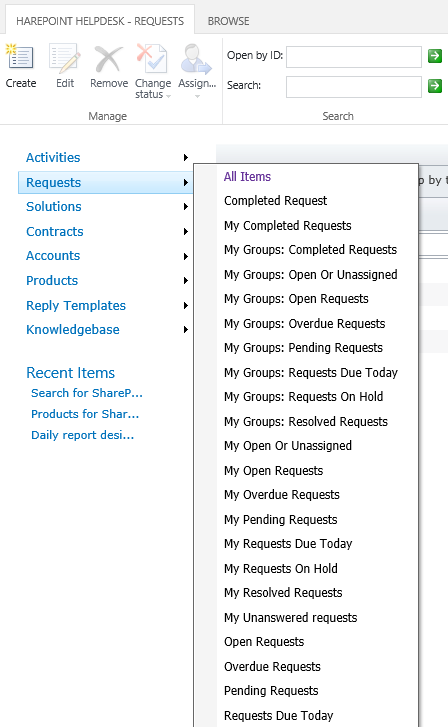
As soon as a new request is created it is displayed in the Technicians Dashboard. There are number of different views which can be used by technicians to work with the lists of requests, such as:
- All Items
- My Open Requests
- My Overdue Requests
- My Pending Requests
- My Unanswered Requests
- Open Requests
- Requests Due Today
- Resolved Requests
- Unanswered requests
- Unassigned Requests
- etc.
In addition, a number of filters can be used to sort and display request by various criteria.
To open a request for processing (answering), it can be selected from the list of requests or its Request ID or keywords can be entered in the search fields at the top.
When a technician answers the request, HTML formatted text can be used, and the technician can also add one or more attachments to the reply.
Providing the user a resolution
Technicians can mark a reply as a resolution. In this case, the request status is changed to “Resolved,” and a special message is sent to the user to confirm the resolution. The user may click the URL and confirm the resolution, in which case the request will be closed. If the user answers the request (using the web part or email), the resolution is not approved, and the request status is changed back to Open. A notification is sent to the responsible technician stating “The resolution is not approved,” and the technician should continue working to resolve the request. If the user skips the approval request, the request will be closed automatically in ten days (This number can be adjusted in the product settings).
Quick reply templates
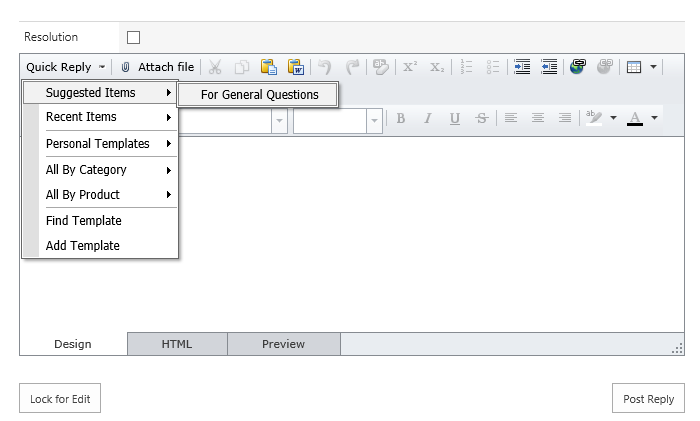
To speed up replies to frequently asked questions, technicians may use “Reply templates”. Technicians can also create personal or public reply templates for different categories of requests and for different products. A reply template can be selected by a technician while replying to the request and the HTML formatted text will be inserted into the message.
Personal signature
Technicians can create personal signatures which will be inserted into the reply message automatically when replying to requests.
Printing requests
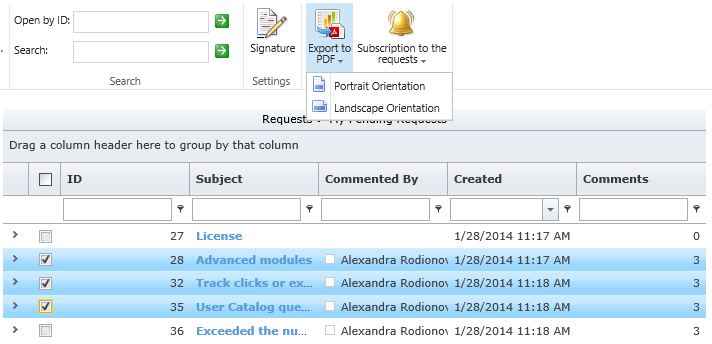
When a technician views or answers a request, the thread can be exported to PDF for printing. This operation can be performed for one current request or for a number of requests selected for export.
Using Knowledge Base
HarePoint HelpDesk includes a simple Knowledge Base. Articles from the Knowledge Base are displayed in the web part when the user creates a new request. The HelpDesk searches through articles by keywords specified in the request subject line, filters the articles by selected product and category, and displays the resulting articles to the user prior to submission of the request. Articles can include HTML formatted text and attachments. The number of articles is not limited.
Adding additional fields to the request creation form
The product allows you to add an unlimited number of additional fields which will be displayed to the user when a new request is created. It is possible to use all standard SharePoint types of fields (such as “Single line of text,” “Choice,” “Lookup,” etc.) to create additional fields. At first, it is necessary to add new fields into the SharePoint List named “Requests.” This list stores the requests and the list structure must include all the fields. Next, it is necessary to configure the product to display new fields. This can be done on the Product Settings page, which is located in “Site actions – Site settings.” There are two forms where new fields should be selected to be displayed: “Request form for users” and “Request form for technicians.” As soon as new fields are selected in these forms, they will be displayed to the users and technicians.
Customization of forms
The product allows you to customize the set of fields which are displayed to users and technicians, as well as to specify the order in which the fields are displayed. If you need to perform deeper customization you can create a new form using all the power of Microsoft InfoPath Designer and connect this form to the “Requests” list. In this case you will need to use the “InfoPath Form Web Part” instead of “HarePoint HelpDesk Web Part” to allow users to create new requests using this customized form. To get more details about using Microsoft InfoPath Designer to create custom HelpDesk forms, view the following article on our website: Creating HarePoint HelpDesk custom request form with InfoPath Designer.
SLA rules
There is a very flexible system for SLA rules in the HarePoint HelpDesk to monitor the request reply time and resolution time. The rules can do the following:
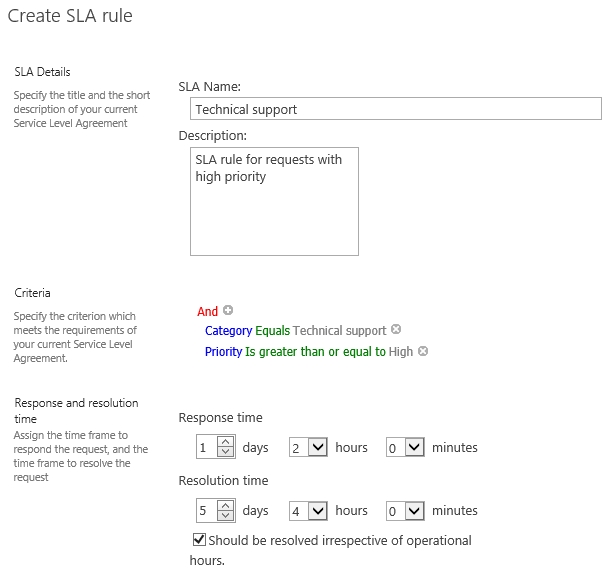
- send notifications to inform the technician if the respond or resolution time is ending soon;
- send notifications if the respond or resolution time is out;
- change the priority of the request;
- assign the request to another technician (escalate).
There are four escalation steps which can be configured for each SLA rule.
The number of rules is not limited and it is possible to create separate SLA rules which will be applied to the request with specified priority, created by specified users or users from specified domains, etc. The full list of fields upon which the SLA rule can be applied is the following:
- Status
- Level
- Product
- Mode
- Source Information
- Priority
- Support Rep
- Support Group
- Contact
- User
- Category
- Due By Date
- Response Due By Time
- Date Responded
- Date Completed
- Description
- Cc
- Resolution
- Comments
- Commented
- Commented By
- Commented By Role
- Source E-Mail
- Outbound E-mail
- SLA Rule
- Previous Due By Date
- Previous Response Due By Time
- Request Opened
- ID
- Modified
- Created
- Created By
- Modified By
Customization of Workflows
SLA and notification activity is performed by SharePoint Workflows. Some of the parameters can be adjusted in the product settings, but if you need to adjust the operation algorithms, it is necessary to adjust the workflows using SharePoint Designer.
There are two articles on our website which can help you understand how the workflows are used and how you can customize them:
- Automation of request processing based on declarative workflows.
- Workflow algorithm for request processing.
To get more details about the workflows used, look at the Administration Guide section regarding “HarePoint HelpDesk Workflow activities” (page 45).
HelpDesk usage reports
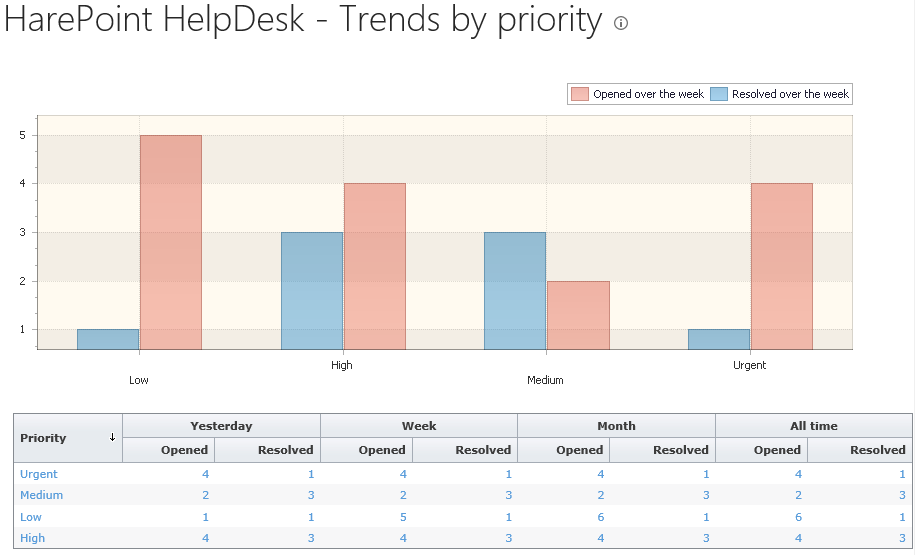
HarePoint HelpDesk includes 20 reports which can be used to obtain general indicators about usage of the HelpDesk by users and to analyze the efficiency of technicians’ work. The Reports Dashboard can be opened from Site Actions – Site Settings – HarePoint HelpDesk – Reports
The reports provided offer the following analysis:
- Request trends – The reports in this group show you: the number of requests created by day, category, or product; the number of requests assigned to the technician by day; etc.
- Resolution time – The reports in this group show the number of resolved requests in the selected time period and average resolution time. You can get this data for requests grouped by priority, category, product or responsible person.
- Response time – The same reports as in “Resolution time” group but these reports show you the response time.
- SLA violation – The reports in this group allow you to see the number of requests which were not resolved on time.
To generate a report, click the report name in the Reports List. Some reports include charts and tables, while other reports show a data table only. If the report shows the number of requests, then it is possible to click the number and see these requests in the Technician Dashboard.
Export to a PDF or Microsoft Excel file is supported, and you can also subscribe and get the required report automatically by email by scheduler.
Technical details
HarePoint HelpDesk for SharePoint is compatible with:
- Microsoft SharePoint Server 2019;
- Microsoft SharePoint Server 2016;
- Microsoft Office SharePoint Server 2013;
- SharePoint Foundation 2013;
- Microsoft Office SharePoint Server 2010;
- SharePoint Foundation 2010.
As a SharePoint website, the product stores all data in standard SharePoint Lists. This means you do not need to use a separate Microsoft SQL Database for the HelpDesk, and standard SharePoint backup procedures can be used to obtain a backup of the HarePoint HelpDesk website.
Permissions to work with the HelpDesk are managed by SharePoint, so only authorized users can work with Technician Dashboard and with the HelpDesk web-part. It doesn’t matter for the product how the user is authenticated on SharePoint (Windows authentication, FBA (claims-based), etc.). If the user is authorized on SharePoint it is possible to add the user to one of two HelpDesk Roles – “Users” or “Technicians” – to provide access to the HelpDesk website. To learn more about configuration of user access to the HelpDesk website, look at the Administration Guide section, “Settings Access Permissions”.