


This article describes how to get data from an SQL server database table and use the data to generate an invoice.
In this example, we will create a SharePoint Workflow which gets data from the database table and generates an invoice. The generated invoice will be sent to email recipients, and a copy of the invoice will be saved in a document library. The invoice will be generated and sent as soon as a new item is added into the list.
The invoice will be generated with data received from the following sources:
- SharePoint List Item – Invoice number, Client name, Description of the goods and price.
- SQL database table – postal address of the client and email address to which the invoice will be sent.
This workflow cannot be created using only the standard actions and conditions available in SharePoint; we will use several actions provided in HarePoint Workflow Extensions for SharePoint:
| Component name and type | Set of Workflow components | |
| SharePoint Workflow | HarePoint Workflow Extensions | |
| Copy or Move Documents (action) |  |
|
| Update Word Document (action) | |
|
| Convert Document (action) | |
|
| Wait Conversion Job (action) | |
|
| Action Execute SQL Command (action) | |
|
| Delete Item at URL (action) | |
|
| Send E-mail with Document as Attachment (action) | |
|
| Get Array Item (action) | |
|
| If any value equals value (condition) | |
|
| Log to History List (action) | |
|
The Workflow will start when a new item is added to the SharePoint list, and it will work in the following manner:
- Make a copy of the invoice template
- Get data from the SQL server database table
- Fill the invoice copy with the data gathered from the SharePoint List and the database table
- Convert the invoice to a PDF file
- Send the invoice to a email recipient
- Save the PDF in the document library
Before creation of the Workflow it is necessary to do the following:
- Create a template of the invoice. You can download an example template here. We used Content Control elements in such fields as Invoice Number, Client Name, Price, etc.
- Save this template in Shared Documents.
- Create a document library called “Invoices” where the workflow will save sent invoices.
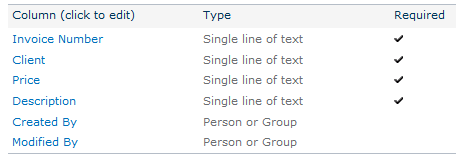
- Create a list with relevant columns. The List contains the following fields:
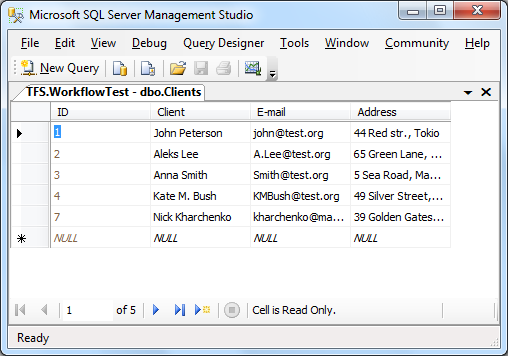
- Create a database table “Clients” which contains Clients Names, street addresses and email addresses:
- Start SharePoint Designer, open the web-site, point to “Workflows”, click the “List Workflow” button on the ribbon and select the List which you created at step 4. The Workflow will be linked to this List. Type a name for the Workflow. Click OK. The empty workflow is now created.
Let’s start creation of the Workflow.
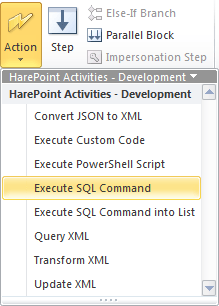
First, we should add an Execute SQL Command action to get data from the database. This action is located in the Development category:
The first parameter should contain an SQL request. In our case it would be:

This SQL request returns the email and postal addresses of the client whose name is equal to the client name of the current list item which is added.
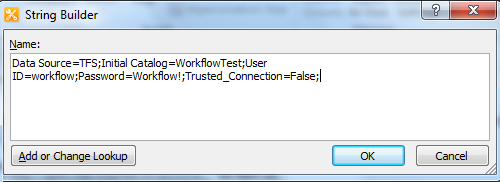
The second parameter is a connection string to the SQL Server database. In our example it looks like this:
The third parameter is the type of the database which is used. In our example it is “MS SQL”.
The fourth parameter which we should specify is the name of the variable which contains the results.
The last parameter is a variable which contains the number of found strings.
The configured action looks like this:

The next step is to check the resulting data and determine how many records were found by our SQL request.
To check it we will use the “If any value equals value” condition and set the variable “RecordsAffected” (which was filled in by the previous action) as the first parameter. We will make sure that it is equal “1”, otherwise there was ether no data found or the database contains several records with the same client`s name. The configured component looks like this:

If the SQL request returns a single row of data, we can continue. Otherwise we will save a notification in the Workflow log using the Log to history list action.
Next, we should load data returned by the SQL script into separate variables. To do that, the Get Array Item action of the Arrays actions group will be used:

In this step we obtain all necessary data from the SQL database and start generating invoice.
To copy the invoice template we should use the Copy or Move Documents action from the Document Library group.

The link to the document template should be specified in the parameters for this action. The full path to the document should be specified. In our example it is as follows: http://sp14.vlab.mapilab.local:133/Shared%20Documents/invoice.docx
The new file should be placed into the document library “Invoices” which we created in the Step 3. It is necessary to specify the full path to the document library. In our example it is as follows: http://sp14.vlab.mapilab.local:133/Invoices/
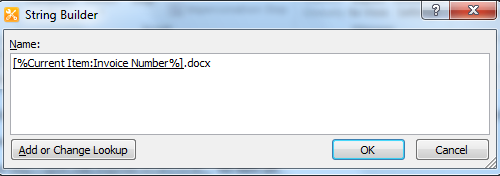
Set the invoice number field to be used as the data source for the file name:
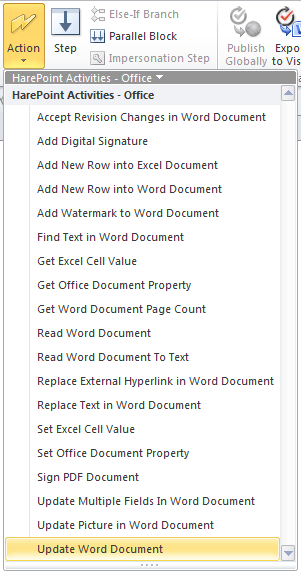
Next, we should use the Update Word Document action from the Office category to replace “Content Control” values in the document with the values of the corresponding fields of the new item in the document library.
We select Content Control as the parameter and indicate which document should be updated. Also, we should indicate the data that should be added to the field:
We type in the Content Control name, then specify the name of the document to be updated and the text format. Latest versions of HarePoint Workflow Extensions have additional parameter to specify which occurrences of the content control need to be updated. For this example, you can keep the default option “all occurrences”:

The remaining fields are to be filled in similarly but for the field which should be filled in with data from SQL database we should select “Variable: SQL Address”:

Next, we should add an action to convert the updated document into a PDF file.
To do this, we will use the Convert Document action (this action is located in the Document Conversion category).
The previously filled-out Invoice is used as the parameter:

Execution of this action will take a while. So, we need to suspend Workflow until the conversion is finished. For that we will use the Wait Conversion Job action.

After that we will have two invoice files, and the Word document is to be deleted by using the Delete Item at URL action from the Lists category. The path to this document should be specified as the parameter:

Now we should add an action to send the generated invoice via email. The Send E-mail with Document as Attachment action from the Email category will be used.
The ‘To’ address is taken from the new element which was added into the List:

Specify the message subject as well as the path to the generated PDF invoice.
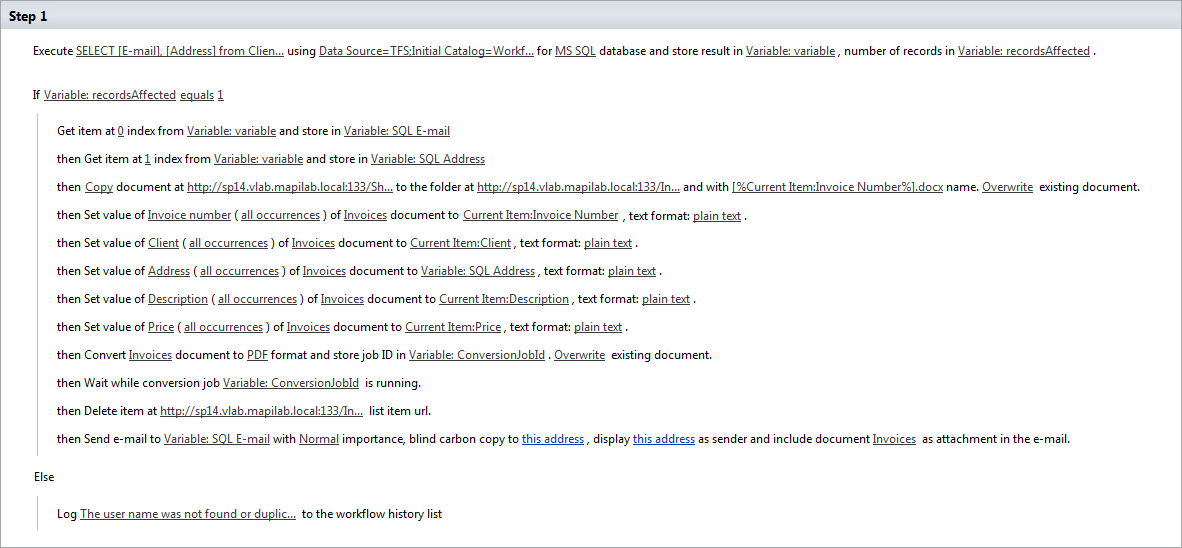
The workflow is now ready. It looks as follows:
Save the Workflow.
Now we should set the Workflow to be launched automatically when a new list item is created. To do this click the “Workflows” link in the left menu of SharePoint Designer, select your Workflow and double click it. Check the option “Start workflow automatically when an item is created” and click the “Save” button on the ribbon. Save and Publish the Workflow:

Test the Workflow:
Create a new list item, wait a moment, and look at the “Invoices” Document Library. Check your mailbox, the invoice in the PDF format should be there. Check the message subject and make sure that all Invoice fields are filled in properly.
Learn more about HarePoint Workflow Extensions and over 350 new actions to automate any business process without programming.