


This example will show you how to use HarePoint Workflow Extension with mail service, receive and process messages, and send e-mail.
Let's examine a fictional situation where employees are entering customers’ requests manually in a special list on a SharePoint portal created using an "Issues" template. In our example, our goal is to automatically enter requests from customers received by e-mail into this list. In order to avoid spam, we will verify senders with the list of clients and if a sender is not listed, we will send him an auto-reply with an offer to contact the company over the phone.
In order to set up an automated solution, our workflow shall download messages from a mailbox via POP3 protocol, process them, and place the results in an applications list.
SharePoint Workflow Extensions offers two activities that perform operations with e-mail via POP3 protocol: the "Receive All E-Mails to List" action and the "Receive E-Mail" action.
- "Receive All E-Mails to List" loads all messages from a mailbox into a specified SharePoint list. Using a workflow which automatically activates when an item is added to the list, you can handle all e-mail messages. Thus, in order to build the solution, we need two workflows and a message sublist: one process will load messages to the list with the "Receive All E-Mails to List" action; the second workflow will contain the message processing instructions, and a separate copy for each message will be activated.
- "Receive E-Mail" loads only the last message from a mailbox, passing its parts to the workflow`s variables. Therefore, recursion shall be used in order to process all messages in a mailbox: if the "Receive E-Mail" uploads a message from a mailbox, then, in the end, the workflow activates itself in order to get and process next message. In this case, we can solve the problem using a single workflow.
In terms of performance and execution time, the first method seems preferable because all child workflows will run almost simultaneously and terminate almost simultaneously. In terms of elegance and simplicity (and simplicity also means lower costs for support and maintenance), the second method is preferable, since in this case we have one workflow, and support list is not needed for its operation. But in case of a large number of messages, mailbox content processing may be significantly longer than in the first case.
You should decline which method to use in your situation. In this article, we will show you both solutions. Let's start using the simple and elegant way.
| Component name and type | Set of Workflow components | |
| SharePoint Workflow | HarePoint Workflow Extensions | |
| Get List URL (Action) |  | |
| Find List Item (Action) | | |
| Get Array Items Count (Action) | | |
| If any value equals value (Condition) | |
|
| Create List Item at URL (Action) | | |
| Get E-Mail Property (Action) | | |
| Receive E-Mail (Action) | | |
| Receive All E-Mails to List (action) | | |
| Save E-Mail Attachments (Action) | | |
| Start Workflow (Action) | | |
| Get Array Item (Action) | | |
| Send an E-mail (Action) | |
|
Simple and elegant solution. Get the latest message and handle it
To solve the task, the workflow will run itself, which implies parallel execution of two copies of the process at some point in time. But there is a limit in SharePoint: one element – one workflow. This means that it is impossible to run multiple copies of a workflow of «Site Workflow» type because in this type of workflow the site is the element itself. For workflows such as «List Workflow», this restriction is less strict – you cannot run multiple copies of the process for one item simultaneously. And it is possible for different elements – we will use this issue.
You can use any element of the list to run the workflow. We can use any element other than the current element to start the process. For example, to get the reference to any other element, we can use the "element whose ID is not ID of the current element” condition for the newly created item (if we create a new item in the course of the workflow), or by means of search («Find List Item» action).
This workflow will work as follows:
- Get the latest unread email from a server
- If the message is received and if it is sent from known address – create a new item in an «Issues» list. Run a new instance of the workflow for this list item
- If the message is received from an unknown address – create a new item in the «e-mails» list and send a reply message to the contact, then start another copy of the workflow for any other item in the list
- Complete operation.
Let’s create a workflow
1.Receive a message
Use "Receive E-Mail" action.

2.Check whether the message is received
To do this, you can check one of the required fields (“subject”).

3.Get message text
We shall assume that the message text may be in simple or in formatted form.
4.Check whether the email address from which you received a message is in the customers list

5.If the address is in the customers list:

- Get sender’s name
- Create an element in the “Issues” list
- Save all attachments from the message
You can also select attachments to save using a filter. E.g., you can use “*.jpg;*.doc;*.docx;*.pdf” filter, which will save JPG images and DOC, DOCX, and PDF documents. - Start workflow copy for the new element
6.If the sender’s address in not in the “Clients” list:
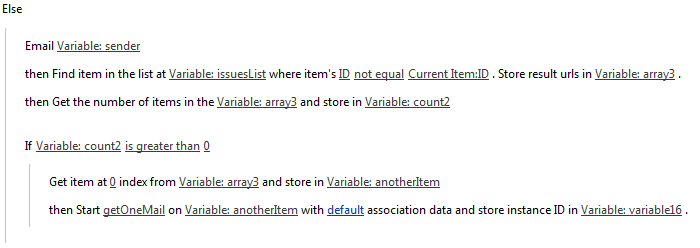
- Send a response message with contact request
- Find another element in the list (with ID, other than current one) and run a copy of the workflow for it
This action is necessary because SharePoint cannot run two copies of a process for a single item.
When you start a ready workflow on any of the items in the list, it will take one message from the mailbox and process it. While the mailbox still has messages, the process will continue to restart itself until all the messages are processed.
Productive solution. Get all messages, add them to the list, process results
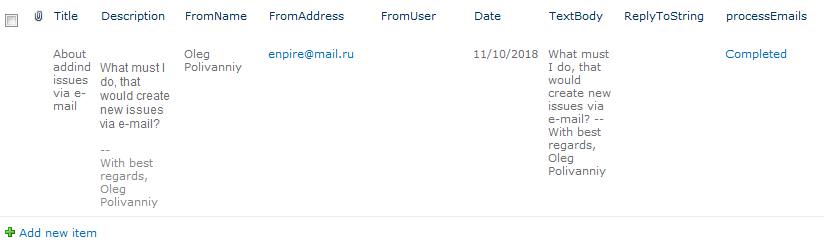
Before you begin creating this workflow, create a list of "Custom" (named "E-mails", for example) type with these fields for data received:
| Column | Data Type | Received data |
|---|---|---|
| Title | Single line of text | Subject |
| Description | Multiple lines of text / enhanced rich text | Html Body |
| FromName | Single line of text | Sender display name |
| FromAddress | Single line of text | Sender e-mail address |
| FromUser | Person or Group | SPUser object, if there is a user with same e-mail address on the site |
| Date | Date and Time | Date Sent |
| TextBody | Multiple lines of text | Message text as plain text |
| ReplyToString | Single line of text | “ReplyTo” |
Also create a list of "Picture Library" type (nameed "Pictures", for example). It is not necessary to change the properties of this standard list.
In order to carry out the task, we divide it into two stages – mail reception and mail processing.
Create a workflow of "Site Workflow" type for the first stage.
This process will collect messages from a mailbox and enter them in the intermediate list ("E-mails", every message as an element of the list). If there are images in the html body of a message, the process will save them in the "pictures" list.
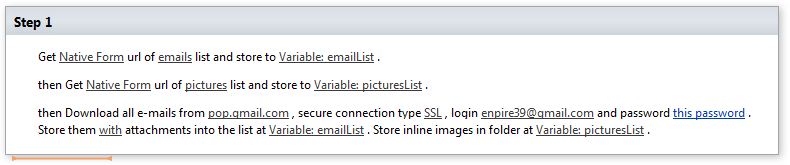
"Receive All E-Mails to List" is the main action in the workflow being created. To ensure its operation, add the "Get List Url" action to the workflow for the "e-mails" list and put the result into a variable. Get the “pictures” list link.

Then add the “Receive All E-Mails to List” action to the workflow. Specify the parameters of the connection to the server address, and the variables with lists references.

This workflow can be started manually or automatically using the free HarePoint Workflow Scheduler software.
Create a "List Workflow"-type workflow for the second stage
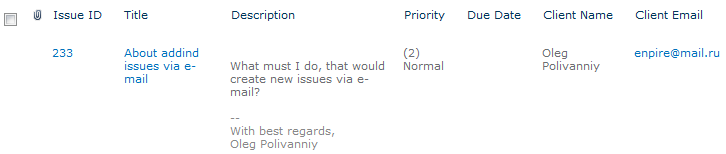
This process will handle incoming messages. If the e-mail address of the sender is in the list of clients, the process enters the data from the message to the application ("Issues" list). If the e-mail address of the sender is in the list of clients, the process puts the data from the message to the application ("Issues" list).
Workflow procedure:
- Check e-mail addresses in the "Clients" list
- If the e-mail address exists in the "Clients" list, create an entry in "Issues" list
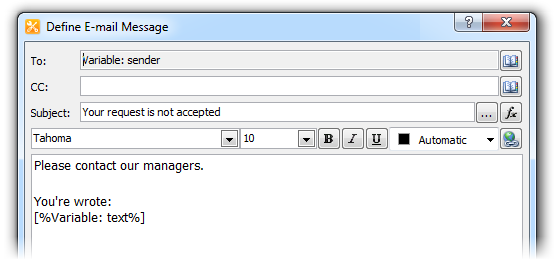
- If the e-mail address does not exist in the "Clients" list, send response e-mail message with the message text quote and contact request.
Specify the "E-mails" list when you create the workflow; enable workflow auto activation in settings when you create a workflow item in the list.
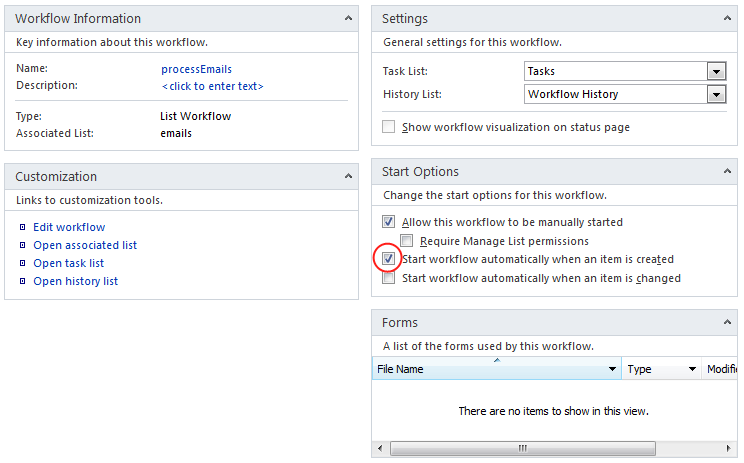
Now this workflow will be activated for a new message when it is added to the list.
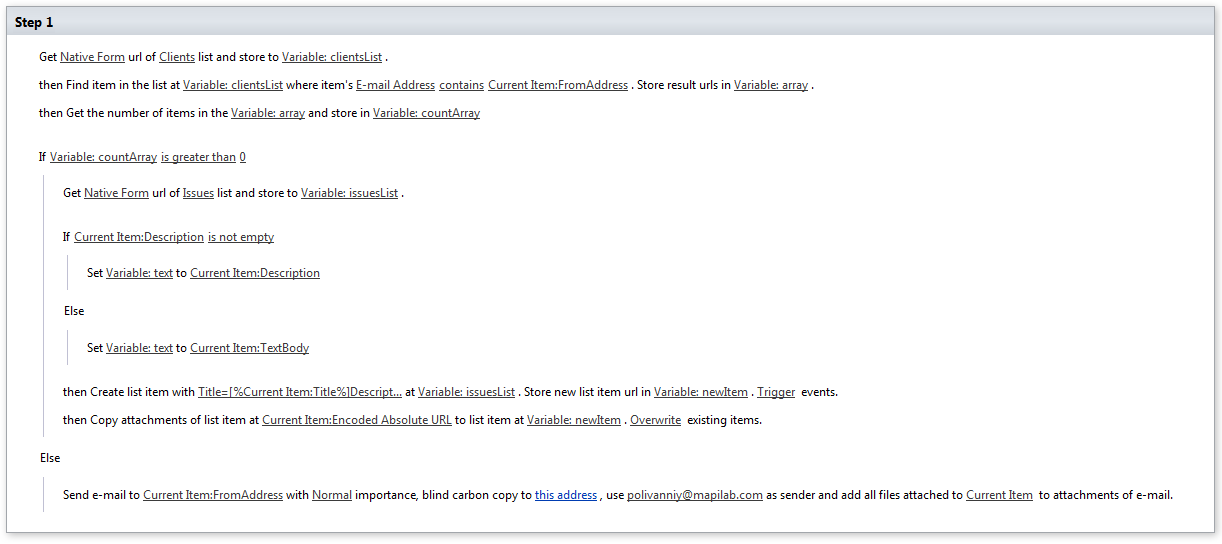
1. Get the link to "Clients" list with the help of the "Get List Url" action.
2. With the help of the "Find List Item" action, select all elements from the list, including e-mail from the "FromAddress" field in "E-Mail Address" field of the current record.
3. Get the number of such records with the help of "Get Array Items Count" action.

4. Create an entry in the "Issues" list if there is at least one such entry ("If any value equals value" condition),


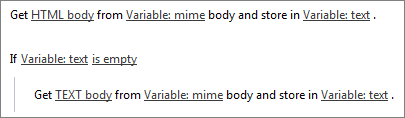
Some mailing systems send formatted text only, some systems duplicate message text in plain text. Check the string in order to avoid loss of the message owing to differences in mailing services operation:
- If the field with formatted text (Description) is not empty use it to enter the applications text.
- If the field is empty, we shall use plain text (TextBody). The result is placed into «text» variable.
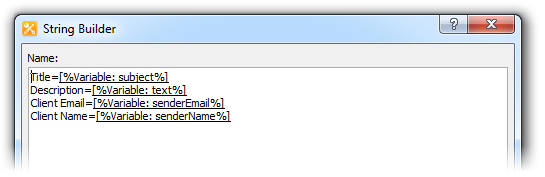
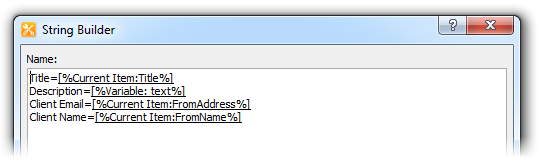
Use the "Create List Item at Url" action to create a new item. You will get the URL for the parameter using the "Get list URL" action. Set necessary fields in INI format within the “specified values” parameter.
5. Then copy attachments from current item into a new one. To do that, use the “Copy List Item Attachments To List Item” action.
6. If there are no such entries send the message.

Thus, we have two workflows automating the entry of new requests received by e-mail upon the completion of all those actions. The ready workflows look as follows:
Mail collector
Mail processor
After starting the first collecting process, all the messages from the mailbox will be placed into the «E-mails» intermediate list.
The second process handles each new item. If the message was sent from a known address, the process creates a new item in the «Issues» list.
Conclusion
HarePoint Workflow Extensions provide a complete set of tools to work with mailing services. Standard tools provide message sending only.
With HarePoint Workflow Extensions it is possible to receive the mail, send emails with attachments (from a file, an element, or URL), and automates many tasks associated with receiving and sorting of messages, automatic response generation, and correspondence record-keeping.